So this is going to be short and sweet and have no pictures. I had planned to do a post on how to make Tom's black beans and rice...come to find out he already posted it. However, I will note that I did not make with beef stock. I followed the directions on the Carolina Yellow Rice package using water and 1 tablespoon of butter. Let that boil and then put in the package of rice and black beans..simmered for about 20 mins and was ready to go!
Anyway, I would just like to talk about my meal tonight. Tonight was what I'm calling the build up meal. Why because items in the meal I needed for a future meal to make it AWESOME! I wanted to make stuffed peppers again (I told you I'm not creative :-)) which meant I needed to have black beans and rice on hand. Also I love Tom's avocado salsa to go with the peppers so I made that tonight as well. So that left me with black beans and rice and salsa with nothing else. I had packaged chicken sausages that I keep on hand to put into pastas and decided to just cook up two of them to serve with my other ingredients.
No it was not a fancy nor a picture worthy meal like Tom makes but thanks to his recipes it came out great and I can't wait to make my stuffed peppers with salsa!
Lastly, I will note that if you have not tried Dole chopped salad bags definitely consider it. I know it is more expensive then buying your own lettuce and chopping it up but sometimes it is nice to come home and know you can have a decent salad buy pulling out one bag. The chopped salads come in great flavors like chipotle cheddar and Bacon & blue cheese (bacon is bagged separately). Oh and they like to advertise they have kale in the salads since everyone LOVES kale these days.
References for prior recipes
Avocado salsa recipe
Black bean and rice recipe
Monday, March 31, 2014
Sunday, March 30, 2014
Heading out on the road again, but before I go ... Oysters avocado & braised short rib ravioli
I only had two nights at home between trips this week, and one of them was spent in a restaurant :-( Tonight, though, I finally got to cook on my own stove and in my own oven so I decided that I wanted to have a bit of fun. Yes, I know that for most of you, spending most of the day picking out ingredients and cooking is not what you think of as fun, but it is for me :-)
Today, I put up a couple of courses ... I started with a cheese plate (not pictured) incorporating a couple of our current favorites Cypress Grove Lamb Chopper & Cowgirl Creamery Mt. Tam.
After that I started with some oysters and thought up a new fun sauce to go with them.

For this dish I built an avocado horseradish puree that I thought would sit well with oysters, neither overriding them nor blandly just providing texture. I served it with the Marquis de Galeda Cava. I am not going to share the full details of this sauce just yet, because it still needs a little work, but trust me that pass one was still pretty tasty.
For the main course, I went with a bit of an old favorite, and just spiced it up a little bit. Shells & I built ravioli with roasted short rib and rainbow chard as the base, and then used the braising juice to build the ultimate sauce for this pasta dish. I began by braising short ribs & rainbow chard with a base of beef stock, crushed tomatoes, diced red onion & diced red pepper.
Short Rib Pasta (2 servings with a little bit left over)
2.5 lbs Short Ribs (~6 ribs)
1 bunch Rainbow Chard
1 15 oz can crushed tomatoes
1 medium red pepper (diced)
1/2 red onion (diced)
16 oz Beef Stock (I used Kitchen Basics, Unsalted)
1/2 cup shredded italian cheese
Roux (1 tbsp butter, 1 tbsp flour) if needed
First thing I did was preheat my oven to 350F. I then began the dish by heating oil in a large saute pan, with a lid, to about medium high heat. I put the ribs flesh side down for about a 30 second sear and then flipped them to bone side for another 30 seconds. I then removed the pan from the heat and added all of the other ingredients, chard first. I covered the pan and put it into the 350F oven ... set a timer for about 3 hours and you've got some time on your hands.
While this is cooking you'll want to make pasta dough but I can't talk to this one as it's the province of Shells ... maybe she'll write a post about it this week while I'm out of town.
After the braising is complete, remove the pan from the oven and get ready for the fun part. Pull the short ribs out one at a time with tongs ... the bones will likely be separated ... thats ok, and put them on a plate. If you get two with bones, keep those aside, otherwise pick the best looking two for presentation and cover them with foil on the plate after you transfer the other four to a cutting board. Put the chard into a strainer over a plate or bowl and allow the sauce to drain out.


At this point using a knife and tongs, tear/chop the short ribs into small pieces and put in a mixing bowl. Rough chop the chard and put that in the bowl with the cheese. Drain the leftover juice from the rib plate and the chard bowl back into the main sauce.
Bing the pan with the sauce in it back up to a boil and begin cooking down to make a thicker sauce for your dish. You can thicken with a little roux (Italian style with equal butter & flour( if you think it's needed.
While the sauce is cooking down begin making and cooking the pasta.


Once the pasta is complete, plate it with a short rib on top:

Covered by the sauce and some parmesan cheese the final dish will look like this:

Today, I put up a couple of courses ... I started with a cheese plate (not pictured) incorporating a couple of our current favorites Cypress Grove Lamb Chopper & Cowgirl Creamery Mt. Tam.
After that I started with some oysters and thought up a new fun sauce to go with them.
For this dish I built an avocado horseradish puree that I thought would sit well with oysters, neither overriding them nor blandly just providing texture. I served it with the Marquis de Galeda Cava. I am not going to share the full details of this sauce just yet, because it still needs a little work, but trust me that pass one was still pretty tasty.
For the main course, I went with a bit of an old favorite, and just spiced it up a little bit. Shells & I built ravioli with roasted short rib and rainbow chard as the base, and then used the braising juice to build the ultimate sauce for this pasta dish. I began by braising short ribs & rainbow chard with a base of beef stock, crushed tomatoes, diced red onion & diced red pepper.
Short Rib Pasta (2 servings with a little bit left over)
2.5 lbs Short Ribs (~6 ribs)
1 bunch Rainbow Chard
1 15 oz can crushed tomatoes
1 medium red pepper (diced)
1/2 red onion (diced)
16 oz Beef Stock (I used Kitchen Basics, Unsalted)
1/2 cup shredded italian cheese
Roux (1 tbsp butter, 1 tbsp flour) if needed
First thing I did was preheat my oven to 350F. I then began the dish by heating oil in a large saute pan, with a lid, to about medium high heat. I put the ribs flesh side down for about a 30 second sear and then flipped them to bone side for another 30 seconds. I then removed the pan from the heat and added all of the other ingredients, chard first. I covered the pan and put it into the 350F oven ... set a timer for about 3 hours and you've got some time on your hands.
While this is cooking you'll want to make pasta dough but I can't talk to this one as it's the province of Shells ... maybe she'll write a post about it this week while I'm out of town.
After the braising is complete, remove the pan from the oven and get ready for the fun part. Pull the short ribs out one at a time with tongs ... the bones will likely be separated ... thats ok, and put them on a plate. If you get two with bones, keep those aside, otherwise pick the best looking two for presentation and cover them with foil on the plate after you transfer the other four to a cutting board. Put the chard into a strainer over a plate or bowl and allow the sauce to drain out.
At this point using a knife and tongs, tear/chop the short ribs into small pieces and put in a mixing bowl. Rough chop the chard and put that in the bowl with the cheese. Drain the leftover juice from the rib plate and the chard bowl back into the main sauce.
Bing the pan with the sauce in it back up to a boil and begin cooking down to make a thicker sauce for your dish. You can thicken with a little roux (Italian style with equal butter & flour( if you think it's needed.
While the sauce is cooking down begin making and cooking the pasta.
Once the pasta is complete, plate it with a short rib on top:
Covered by the sauce and some parmesan cheese the final dish will look like this:
I'm going to be forced to eat restaurant food for the rest of the week so Shells will be posting. Hope you take the chance to maybe make one of these dishes and eat better than I do this week. Hope you enjoy this and have a good rest of the week!
Breakfast tacos ...
There is something about a rainy, cold Sunday morning that just makes me want to say "Forget the gym, I'm just going to cook something tasty and watch cricket." Now while the typical cricket fare is more along the lines of meat pies and beer ... that is not the most realistic breakfast (especially when one has to fly in the AM).
One of my favorite breakfast meals of late, when I get the chance to cook breakfast, is egg tacos. When I cook this dish I like to do my eggs between over easy & over medium; however, scrambled would be another tasty way to do this.
I started both a small non-stick saute pan to cook the eggs in as well as my cast iron for cooking tortillas. I made two tacos for myself using corn tortillas, but you could easily use a flour tortilla for this dish too. I started the first tortilla on the cast iron and added a bit of butter to the saute pan that I planned to cook the eggs in. Once the butter had melted, tilting the pan through the melting process to ensure even cover, I cracked in the two eggs. I flipped the first tortilla and added some cheese and sriracha.
I flipped the eggs over after about 1 minute of cooking, turned off the burner the eggs were on, and then after about 30 more seconds I pulled the first egg out of the pan, put it on to the tortilla and then folded over like a quesadilla. I put down the second tortilla (my cast iron is not big enough to take two tortillas in it at the same time) and repeated the process from the first however this time I added the egg as soon as I put down the cheese and sriracha. After about 1 minute, flip the quesadillas, and another minute and they're done.
At this point the eggs that were over-easy to start should have cooked a little more to about over-medium and your tacos are ready to enjoy!
Saturday, March 29, 2014
San Francisco ... Quince
So this post is not going to feature my food, but it is going to feature some things that will probably be remade at some point in the future. Before I get to that though ... I have to give a shout out to the Hotel Adagio in San Francisco ... very awesome and at $200 a great deal for an Autograph Collection hotel in a major city.
We started the night at the bar in the hotel ...

I have to admit that the desire to go to this bar was partially due to the $10 platinum credit, but mostly do to the sweet mustache/monocole logo. After this we were off to North Beach and our eventual destination ... Quince.
The dinner was good, but not great ... that said there were a couple of fun things that I may be incorporating into dinners in the near future.

The black glass to kick off the dinner was an awesome touch. Especially the fact that it was loaded with Sancerre. Yep, I have 8 of them at the house so this is totally coming to a dinner soon.

This one was fun, sweet shrimp with an avocado puree. Yep, I can totally make that.


The final course I am throwing up here tonight was a ridiculously awesome pasta course ... suckling pig tortellini with black truffle slices! I am not sure where I am going to find a suckling pig, but I do know that Shells will be making pasta sometime soon.
Tomorrow night I get to eat my upteenth restaurant meal for a show night, but I'll be back for a post Sunday night before heading back out on the road.
Thursday, March 27, 2014
Pizza night...and no not delivery!
Tonight I did not feel like making an all out meal (not like I usually do anyway) so I went with an old standby that is not pasta! I decided on making my own pizza. I have found that in many ways making your own is better than waiting for the delivery guy to show up at your door. Now you may not get the best crust in the world but at least you can put on anything you want and not pay $15 for a large pizza.
Tom and I find the pillsbury pizza dough is great to have in the fridge for such occasions. I wouldn't say it is the best crust I have ever had but you have the choice of thin or normal and it has a nice light texture to it...kind of like a biscuit! We choose to buy the thin crust. I follow the directions on the tube which is preheat oven to 400 degrees and pre bake for 5 mins. WARNING: the dough is actually in the shape of a rectangle when you unroll from tube. This makes for some adjustments to get the dough to fit in a round pan. Be sure to grease the pan.
After pre baking the pizza this is where the creativity sets in. I started the pizza this evening with a white sauce. I then covered with a thin layer of shredded cheese. Next up, pre cooked sliced chicken sausage, turkey pepperoni and artichokes. I finished with another layer of shredded cheese.

The pizza then goes back in the oven for 10-12 mins until golden brown. I served with a side of salad and have leftovers to bring for lunch tomorrow.

Tom and I find the pillsbury pizza dough is great to have in the fridge for such occasions. I wouldn't say it is the best crust I have ever had but you have the choice of thin or normal and it has a nice light texture to it...kind of like a biscuit! We choose to buy the thin crust. I follow the directions on the tube which is preheat oven to 400 degrees and pre bake for 5 mins. WARNING: the dough is actually in the shape of a rectangle when you unroll from tube. This makes for some adjustments to get the dough to fit in a round pan. Be sure to grease the pan.
After pre baking the pizza this is where the creativity sets in. I started the pizza this evening with a white sauce. I then covered with a thin layer of shredded cheese. Next up, pre cooked sliced chicken sausage, turkey pepperoni and artichokes. I finished with another layer of shredded cheese.
The pizza then goes back in the oven for 10-12 mins until golden brown. I served with a side of salad and have leftovers to bring for lunch tomorrow.
Wednesday, March 26, 2014
Would you like some flaky bread with dinner?
So if you are a regular reader of our blog you probably already know who does most of the cooking in the household. I would like to clarify that this was decided almost 6 years ago when Tom and I moved in together. We decided he cooked dinners and I did the laundry. Granted I'm supposed to help out as sous chef from time to time and I have the chef coat to prove it :-). Also, the man travels A LOT so I do have to be able to survive when he is gone. However, we figured out very quickly that even though Tom was to do all the cooking he lacked in one area...baking. I'm not going to go into the fact that men can't measure or have patience for accuracy. I will just say that when dough or dessert are involved I'm called in from the sidelines.


layer up!
At a later date I will post my recipe for french baguette which I have perfected over the years. Today I want to write about a bread I tried from the March edition of Bon Appetit. Tom and I receive both Food & Wine and Bon Appetit magazines. We love perusing through each month and mark recipes or restaurants we want to try.
The recipe is below. I will however note the changes I made and what I hope to test when I make again.
Ingredient change - I used bread flour rather than all purpose. I will plan to try all purpose the next time to see if I notice a difference. Also, I didn't have flaky sea salt so I used fine instead.
Hint - Don't be afraid to brush with a good amount of butter. I found if the bread is well coated during cooking and your cast iron is NOT too hot it will cook perfectly.
Any bread product does take time for mastering but this recipe was easy to follow however the rolling out multiple times does get tedious. I suggest don't try making this for a party of 10 coming to your house for dinner in a few hours without preparing ahead of time. We froze a few of the breads and they cooked well however it has only been a few days that they have been in the freezer.
Credit - http://www.epicurious.com/recipes/food/views/Flaky-Bread-51223210
Ingredients
- 1 teaspoon kosher salt
- 3 cups all-purpose flour, plus more for surface
- 6 tablespoons unsalted butter, melted, plus more, room temperature, for brushing (about 10 tablespoons)
- Olive oil (for parchment)
- Flaky sea salt (such as Maldon)
Preparation
Whisk kosher salt and 3 cups flour in a large bowl. Drizzle in melted butter; mix well. Gradually mix in 3/4 cup water. Knead on a lightly floured surface until dough is shiny and very soft, about 5 minutes. Wrap in plastic; let rest in a warm spot at least 4 hours.
Divide dough into 10 pieces and, using your palm, roll into balls. Place balls on a baking sheet, cover with plastic wrap, and let rest 15 minutes.
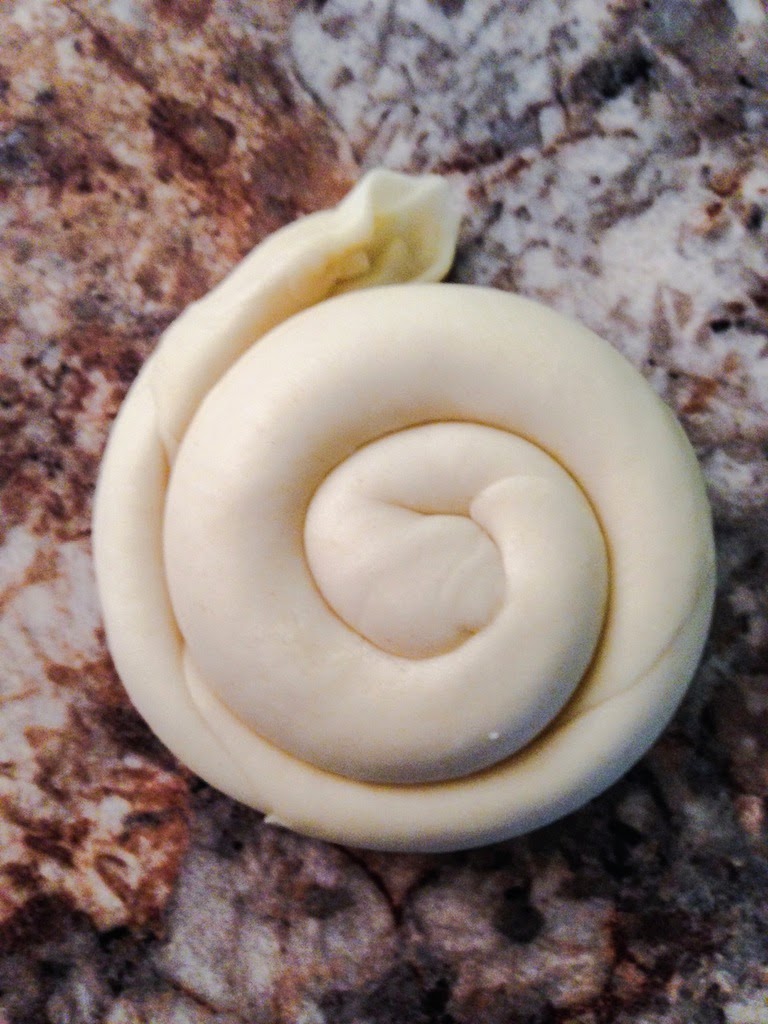
Roll dough into thin rounds, brush with room-temperature butter, and roll up into ropes (see step-by-step instructions, below). Working with 1 coil at a time, roll out on an unfloured surface to 10" rounds no more than 1/8" thick. Stack as you go, separating with sheets of parchment brushed with oil.
Heat a large cast-iron griddle or skillet over medium-high heat. Working 1 at a time, brush both sides of a dough round with room-temperature butter and cook until lightly blistered and cooked through, about 2 minutes per side. Transfer bread to a wire rack and sprinkle with sea salt.
DO AHEAD: Coils can be rolled out 1 month ahead; wrap tightly and freeze. Cook from frozen (add 1–2 minutes to cooking time).
layer up!
It's the buttery layers that set flaky bread apart from all others. To get them, nail this key coiling move.
1 Using a rolling pin and working 1 piece at a time, roll out each ball on an unfloured surface into a very thin round (or oval).
2 Brush with about 1/2 tablespoon butter and sprinkle with flaky sea salt. Roll up dough onto itself to create a long, thin rope.
3 Wind the rope into a tight coil, then roll out again. The rolled-out coil will separate into thin, individual layers. Hello, flaky bread.
Tuesday, March 25, 2014
A new take on beef and greens
Tonight I got home about 6.15 and had to balance cooking dinner with packing for my 5.25am flight tomorrow. While getting another 5000 miles for a 3 day trip is a bonus, I am still not looking forward to the early morning tomorrow and the late night on Friday ... or the 36 hours of meetings in between. I was hoping to do something easy in order to avoid keeping us up late, however I seem to be incapable of that, so ...

I had a flank steak, some collard greens and the potential that Shells was going to bean me for doing beef over greens again this week. Instead I came up the idea of doing a roasted flank steak inside of greens. I created a sauce to go with the beef and assist in the roasting process, and thus the redness you can see in the picture above.
I had a flank steak, some collard greens and the potential that Shells was going to bean me for doing beef over greens again this week. Instead I came up the idea of doing a roasted flank steak inside of greens. I created a sauce to go with the beef and assist in the roasting process, and thus the redness you can see in the picture above.
Green Wrapped Flank Steak
3/4 lb flank steak
7 large collard green leaves (stemmed)
7oz can tomato sauce
1 1/2 Tbsp Frank's Red Hot
1 1/2 Tbsp Worcestershire sauce
1 Tbsp white vinegar
1 Tbsp white vinegar
Kitchen twine
Preheat over to 425F. I mixed the tomato sauce, red hot and worcestershire sauce in a bowl to create the "steak sauce" that I was going to use for tonight. I layered 5 of the greens into a mat and then put the beef on top. I added about 1/3 of the sauce on top of the beef, put the remaining two leaves on top, and then using the twine, rolled the sides from the base up and over the top and tied it off like a birthday present. I sprinkled the vinegar over the top of the greens package and put in the oven in a deep oven pan. About 10 minutes in, I removed from the oven, putan additional 1/3 of the sauce over the top of the package and put it back in the oven. After an additional 10 minutes I removed and added more of the sauce, where needed, and put it back in the oven for an additional 15 minutes (rare beef ... I would do another 20 - 25 for medium rare - medium).
The end result, when sliced, looked like this ...

Crazy good looking, right? Well, I served it with mashed potatoes and salad and it was as good as it looked.

Well, as I mentioned above, I'm heading back out for the next few days, so look forward to some posts from Shells over the next few days, and we'll see what I have the urge to cook when I get home!
Monday, March 24, 2014
Day boat scallops, let's make pasta
While at Whole Foods yesterday I found another surprise in addition to the Snowy Grouper I talked about yesterday. Today Shells & I got to enjoy some beautiful day boat scallops (i.e. caught on a one day out and back fishing boat, not a factory ship). I was always hit or miss on scallops, until I visited Sydney and tried them sushi style. The ones I ate in Sydney had been pulled out of the water that day, and once trying that, I was hooked. Not wanting to eat these raw, I figured what better way to enjoy them than grilled up and served on top of pasta with a light wine sauce.

I used a fun long flat noodle as my pasta base for this dish. I tend to find that flat pasta works well with scallops and broad greens like kale as it holds up with the tastes and cutting. For this dish I made the pasta while starting the main part of this dish, and cooked the scallops about 10 minutes into the preparation to ensure they didn't get overcooked.
Kale, Mushroom & Caper pasta sauce
1 bunch of Kale
7 Crimini mushrooms
1 generous tablespoon capers
2/3 cup white wine
Trim and tear kale, slice Crimini mushrooms. Saute the mushrooms and kale with a little bit of olive oil (using a cover for the pan may help cook the kale down enough to make sauteing easier) for about 10 minutes. Add the wine and capers to the pan, continue to cook at medium high heat for about 5 minutes. After 5 minutes, add the pasta, toss to mix and plate. Top with the scallops and enjoy.
Sunday, March 23, 2014
Only a couple of days before I travel, let's start with the fish ...
There is nothing better than a nice, fresh piece of fish to dress up with all sorts of fun things. Tonight I found a beautiful piece of Snowy Grouper at Whole Foods that I knew would be perfect under the broiler.

I dressed up the fish with some fresh broccolini, black beans & rice and avocado salsa. The black beans and rice is a recipe that I iterate on often, but always come back to a basic recipe.
Tom's quick black beans & rice
1 can 14.5oz black beans
1 pkg saffron rice
2 cups beef stock
1 pkg Goya sazon
Put all contents in a 3 qt saute pan, and put on medium high heat. Bring to a boil, stirring often, reduce heat to low & cover. Continue to simmer until rice & beans have absorbed liquid (stirring occasionally) ... reduce from heat and remain covered for 5 minutes. Fluff and serve.
Saturday, March 22, 2014
After traveling, just want something nice and easy ...
My flight home from Cincinnati was supposed to have me back in Richmond by 4.45 on Friday ... it arrived in Richmond at 9.45pm. After 4 days of restaurant meals, followed by a day of meals in airports (yes, they are different things) I had that special feeling and I was looking forward to cooking a nice meal at home. For those of you who also travel frequently, you know the feeling I am talking about ... that feeling where the large quantity of salt and preservatives you've consumed ultimately overwhelms you in a feeling of general malaise.
Tonight I wanted something easy, and tasty, that would allow me to start getting the salt out of my system and the cleansing to begin. I didn't quite get to the level I had intended, but it was tasty none the less.
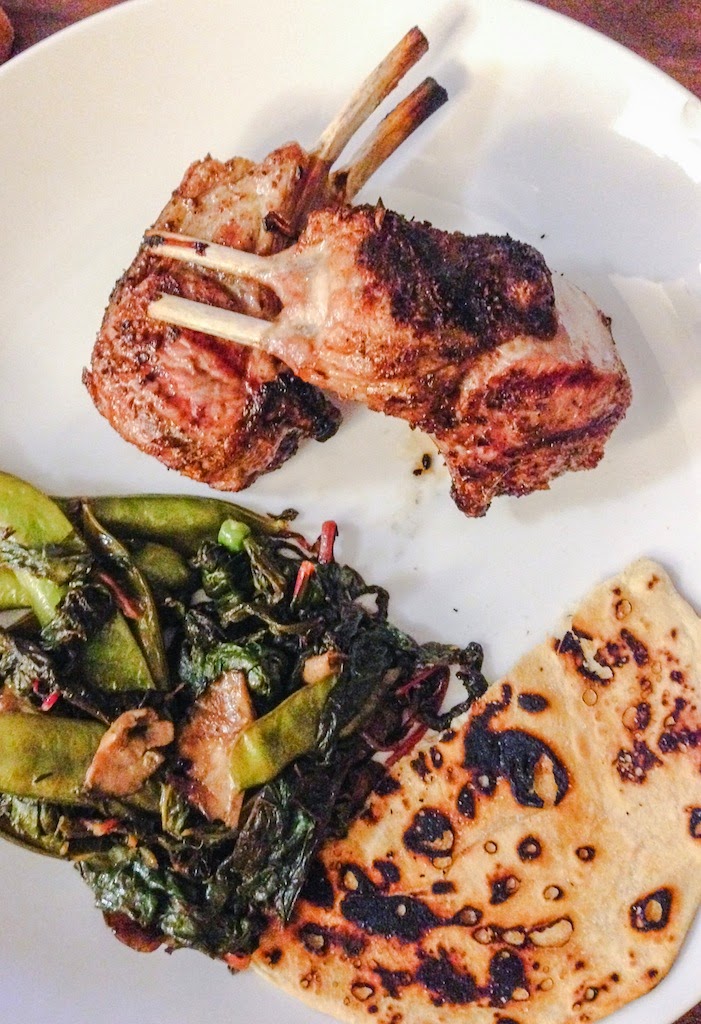
I went with a French Rack of Lamb, cut in to two bone pieces, that was sprinkled with truffle salt and then encrusted with crushed, dried, hedgehog mushrooms. The lamb pieces were grilled on a hot grill for for about 5 minutes each on the top and bottom, and two minutes per side.
I added a sauteed mixed veg combining rainbow chard, english peas & rough chopped shiitake mushrooms and a flat bread of Michelle's design that was cooked on a flat cast iron pan.
I head back out on the road on Wednesday, so look for some fun recipes the next few days from me ... followed by a couple of quick hits from Shells.
Tonight I wanted something easy, and tasty, that would allow me to start getting the salt out of my system and the cleansing to begin. I didn't quite get to the level I had intended, but it was tasty none the less.
I went with a French Rack of Lamb, cut in to two bone pieces, that was sprinkled with truffle salt and then encrusted with crushed, dried, hedgehog mushrooms. The lamb pieces were grilled on a hot grill for for about 5 minutes each on the top and bottom, and two minutes per side.
I added a sauteed mixed veg combining rainbow chard, english peas & rough chopped shiitake mushrooms and a flat bread of Michelle's design that was cooked on a flat cast iron pan.
I head back out on the road on Wednesday, so look for some fun recipes the next few days from me ... followed by a couple of quick hits from Shells.
Wednesday, March 19, 2014
Need a no carb replacement for Pasta?
When Tom is traveling I tend to keep to a few basic "food groups". Primarily those groups revolve around one of my most favorite foods, pasta. Well, any carbohydrate really but who is counting :-). I do attempt to not make the same food..err carb every night (and honestly if I ate pasta every night that Tom was gone I would have to go to the gym insanely more times that I do now). So maybe a year or so ago I was introduced to spaghetti squash which I was promised was just like pasta. Now I will be honest, it is not exactly like pasta but when you think about it..you usually put sauce with vegetables and/or meat with your pasta anyway so how much do you really "taste" your pasta. Plus the squash is so much better for you!
Spaghetti squash in itself is an amazing vegetable. To be able to cook it and then literally fork through it and get strands of vegetables that mimic pasta is pretty cool. Below is my finished product of last night's meal.
When you buy spaghetti squash it usually comes with a sticker with instructions on them. Those instructions usually say cook in an 350 degree oven for 45 mins to an hour until soft. Well, I don't know about you but when I come home from work the last thing I want to do is wait an hour for my part of my meal to cook. So I was actually told you can microwave it. I tried it and it works. I will admit I have not actually tried to bake it in an oven so I can't vouch for the fact that one may be better than the other. However, 8-10 mins in the microwave is certainly a lot nicer than waiting an hour.
Spaghetti Squash (In microwave)
1 Spaghetti Squash
1 glass or microwave safe dish that will fit spaghetti squash
plastic wrap
water
Note: I am usually cooking for one and use only 1/2 of the squash. You may need to microwave whole squash for 3-4 people (still cut in half)
Cut spaghetti squash in half
Using spoon clear out center of squash (seeds etc..think pumpkin insides)
Place 1/2 spaghetti squash center facing down in microwave safe dish
Pour water to cover about 1/2inch of the squash
Seal tightly with plastic wrap
Microwave for 8-10 mins.
Water will boil, check squash (carefully) feel if squash is soft...if so take out and let sit for a minute
Unseal and flip squash over
Use tongs or fork and scrap at the sides of the squash, the squash will separate and look like pasta noodles
Place in bowl or plate and mix with desired toppings and/or sauce
Bon Appétit
Spaghetti squash in itself is an amazing vegetable. To be able to cook it and then literally fork through it and get strands of vegetables that mimic pasta is pretty cool. Below is my finished product of last night's meal.
 |
| Spaghetti Squash with Chicken Sausage and Vegetables |
Spaghetti Squash (In microwave)
1 Spaghetti Squash
1 glass or microwave safe dish that will fit spaghetti squash
plastic wrap
water
Note: I am usually cooking for one and use only 1/2 of the squash. You may need to microwave whole squash for 3-4 people (still cut in half)
Cut spaghetti squash in half
Using spoon clear out center of squash (seeds etc..think pumpkin insides)
Place 1/2 spaghetti squash center facing down in microwave safe dish
Pour water to cover about 1/2inch of the squash
Seal tightly with plastic wrap
Microwave for 8-10 mins.
Water will boil, check squash (carefully) feel if squash is soft...if so take out and let sit for a minute
Unseal and flip squash over
Use tongs or fork and scrap at the sides of the squash, the squash will separate and look like pasta noodles
Place in bowl or plate and mix with desired toppings and/or sauce
Bon Appétit
Monday, March 17, 2014
Can she recreate a recipe? Why yes she can...
We haven't heard any feedback of any readers attempting one of Tom's recipes so I thought it only fair that while he is traveling I make an attempt to follow one of his posted recipes and see if I could recreate. Result...It seems that Tom does it a pretty good job giving recipe instructions on this blog. While Tom is away I go back to a few things I enjoy and can cook rather well (at least I seem to think so) one of them is stuffed peppers. I LOVE Tom's stuffed peppers and I asked him a billion questions as he cooked them over the years and I finally have remembered most of the instructions :-). This evening I decided to prepare the stuffed peppers and pair with his avocado salsa.


This was the salsa in the tupperware just after shake up. A few hints for anyone interested in attempting this recipe. You probably can go lighter than 1/2 of red onion especially if you are sensitive to the taste. I put in a bit too much and really could taste it. Also when choosing your avocado I would go with one that is not very ripe and extremely soft..you will find that it will get a bit smooshed in the shake up process! Otherwise this tasted great and hoping I can figure something out to make tomorrow with it.
I followed Tom's recipe for cook time with the peppers. I also had black beans and yellow rice from leftover from my meal last night. So I then put in 1 1/2 cilantro and red pepper chicken sausages and some shredded cheese with about a cup of the beans and rice and put into one bell pepper and one somewhat decent size cubanelle pepper. Final product...
Let's just say I don't plate as well as Tom but for a dinner for one in less than 1 hour I was pretty pleased with myself. Two days down and 3 more to go until chef ...err...I mean hubby gets home!
Bon Appétit
Sunday, March 16, 2014
Restaurant Review (Thai Siam Takeout, Colleen Va)
 A coworker and I headed out to Lynchburg, VA for a work meeting on Friday. We were heading back to Richmond right about lunch time and my co-worker mentioned he had heard great things about a Thai place that is on the way back to Richmond. I of course was a bit shocked that a fantastic Thai place would be off a country road in VA. However, Trip Advisor supported the opinions that this place will be great (just hope they are open and will serve you). We drove up and this is what we saw...
I have to say I was a little nervous but actually pretty excited to find out if this place was as good as everyone had talked about. We walked in and there were two other tables with people and the place smelled great. This place is small so I understand why they have take out in the name. One table in the restaurant had groceries from the mornings purchases. Let's just say they don't focus on the decor in the restaurant.

 |
| Drunken noodles |
 |
| Vegetable Fried Rice |
 |
| Basil Chicken Stir Fry |
 |
| Thai Dumplings |
It was exciting to find this great little gem on a country road in Virginia! It made the 4 hours in the car all the more worth it!
Thai Siam Take Out
Tues-Sat 11am - 7pm
4137 Tye Brook Highway
Colleen, VA 22922
Saturday, March 15, 2014
(Close enough to ...) St. Patrick's Day 2014
Once upon a time (12 years ago) a friend and I devised a most ingenious plan ... we would drink a lot Guinness and Jameson on St. Patrick's Day (yep, not the most imaginative of plans). A few years after that I realized that while drinking all day is fun and easy in college, I should probably add some food. And so my Irish party gained traditional Irish fare. Over the years I hosted this party on 3 continents, and at one point cooked as much as 30 lbs of Corned beef in a day. These days the party is infrequent, due to trave it hasn't happened the last two years ... but I still like to cook a little corned beef.
Five years ago I had a revolutionary idea, I started small (3 lbs out of 30), that I would start roasting the corned beef, pulled pork style, instead of boiling or slow cooking it. I was used to my corned beef going quickly, but that 3 pounds disappeared faster than anything I had ever seen before. So I started to change the ratio until I finally didn't bother boiling anymore. I roast the corned beef at 350F for 3 hours, wrapped in foil with a little bit of olive oil and pickling spices.
Today was just Shells and I eating as I have to get on a plane tomorrow morning so I couldn't have a good old fashioned party (well, I didn't mind but Shells didn't want to have to clean it up by herself). The best part about it just being the two of us, was that I was free to have some fun with the brisket tonight.


Five years ago I had a revolutionary idea, I started small (3 lbs out of 30), that I would start roasting the corned beef, pulled pork style, instead of boiling or slow cooking it. I was used to my corned beef going quickly, but that 3 pounds disappeared faster than anything I had ever seen before. So I started to change the ratio until I finally didn't bother boiling anymore. I roast the corned beef at 350F for 3 hours, wrapped in foil with a little bit of olive oil and pickling spices.
 |
| Corned Beef, First Cut, coming out of the oven |
 |
| Roasted corned beef brisket on the cutting board |
Today was just Shells and I eating as I have to get on a plane tomorrow morning so I couldn't have a good old fashioned party (well, I didn't mind but Shells didn't want to have to clean it up by herself). The best part about it just being the two of us, was that I was free to have some fun with the brisket tonight.
Tonight I started with brisket quesadillas. I threw some corn tortillas on the cast iron with a little Dubliner cheese and some of the brisket. Tasty.
Next I decided to do roasted oysters and clams au brisket. I'm still working on the name, but the end result was totally worth it. I used a combination of oysters and clams, topped them with shredded brisket and then Dubliner cheese. Roasted at 350F for about 20 minutes, they came out with a melty and cheesy topping.
The final item on the dinner list was a twist on an old favorite ... meat pies. I made these pies with corned beef, veggies & a Guinness sauce. Once assembled (see above) it was time to go into the oven. The pie was actually quite simple to put together ...
Corned Beef & Guinness Pie
1/2 pound brisket (cooked as noted above)
12 mini carrots (chopped)
7 shiitake mushrooms (rough chopped)
1 small yellow onion (diced)
1 cup beef stock
1 cup Guinness
2 cups peas
1 tbsp flour
1/2 cup Dubliner (shredded)
1 pkg puff pastry
1 egg
Start a saute pan on medium high heat ... put the brisket, carrots, mushrooms, onion, stock, Guinness & peas in and bring to a boil. Continue cooking down at a boil, adding the flour a little bit at a time, until the liquid is mostly evaporated.
Roll out the puff pastry, and line two 5 inch pie pans with it. Fill the pies with the meat and veg mixture. Add half of the cheese on top of each mixture before putting a sheet of pastry over the top of the pie, crimp the corners well to avoid separation. Beat the egg and brush over the two pies before baking. Put a little knife slice into the top of each pie to prevent an oven explosion. Cook the pies in a 350F oven for 35 minutes. I topped mine with mashed potatoes (Australian meat pie style) and served them with braised dandelion greens and a pretzel roll.
Oh, and of course I enjoyed them with a few nice, frosty, Guinness Stouts. Enjoy!!
Thursday, March 13, 2014
If brined pork is so good then why not brined ... ???
As I've written about previously, I have been having a bit of a love affair with brined pork this winter ... well, I figured if pork was so good when brined, other things must be too. I have been having dreams (and if you find this sad you can just stop reading right now) about brined ribs and and brined skirt steak ... but I thought I would start a little lighter and go with brined chicken tonight.
Following a similar method I've been using on pork, I sealed the chicken breasts in a ziploc bag with pickle juice for about 24 hours before cooking them. I grilled the chicken, finishing it off with a quick glaze, and caramelization, of some bar-b-que sauce to add a little sweet to offset the savory.

I served the chicken with sauteed greens and mushrooms, hand cut baked potato chips and salad.
Following a similar method I've been using on pork, I sealed the chicken breasts in a ziploc bag with pickle juice for about 24 hours before cooking them. I grilled the chicken, finishing it off with a quick glaze, and caramelization, of some bar-b-que sauce to add a little sweet to offset the savory.
I served the chicken with sauteed greens and mushrooms, hand cut baked potato chips and salad.
Lately it's been corporate by day & night ...
The last few days have been pretty hectic getting ready for a workout next week, so while that has not prevented me from cooking, it has put a damper on my posting ability. This is going to be a bit of a quick post, but I thought I'd catch up on the last couple of nights' dinners while I have a few minutes between meetings.
Tuesday night I decided to try something a little new, a buffalo flat iron steak. I marinated it in Stubs Steakhouse Marinade overnight and then grilled it.


Tuesday night I decided to try something a little new, a buffalo flat iron steak. I marinated it in Stubs Steakhouse Marinade overnight and then grilled it.
I served the steak sliced over black beans and rice and topped it with grilled red onion and sliced avocado. I served a salad on the side.
Wednesday night we went back to an old favorite ... stuffed peppers. Usually I don't break this dish out until the farmer's market opens and I can go get nice big local sweet & spicy peppers, but I decided to use some bell peppers to make this work instead.
For the stuffing I mixed in some of the leftover rice and beans from the night before with de-cased cilantro chicken sausages and some shredded cheese. I topped & deseeded the peppers, stuffed with the mixture and then baked them on 425F for about 40 minutes, turning a few times to make sure that all sides blistered a bit. With about 5 minutes to go I put some shredded cheese on top of each and let it melt. I topped the peppers with avocado salsa & served with quesadillas and salad.
Quick avocado salsa
1 avocado (medium)
15 cherry tomatoes
1/2 lime
1/2 red onion (small)
1 hot pepper
I rough chopped all ingredients but the lime and added to a tupperware container, squeezing the lime juice over. A good shake of the container mixed the ingredients and then I let sit in the fridge while I cooked dinner. One more shake to ensure everything was mixed well and it was ready to go.
Monday, March 10, 2014
It's a grouper sort of night ...
Tonight just felt like a good night for a nice easy dinner ... and I had a nice fresh piece of grouper ... and so that's what I went with. Tonight I was once again punished by my lack of purchasing propane and so I had to broil this piece of fish instead of grilling it. No worries, it turned out awesome anyways.

To go with this very basic fish (I added a little seasoning and put it right under the broiler for about 15 minutes) I went with white beans with bacon & kale. Canned white beans mixed with whatever make for a very simple, yet tasty side dish. I added a salad and a roll to finish this mean off.
White Beans w/ Bacon & Kale
1 14.5 oz can white beans (cannelloni beans)
1 bunch kale (de-stemmed and rough chopped)
3 pieces bacon (I used Whole Foods habanero bacon)
1 cup beef stock (I used Kitchen Basics)
Put white beans, bacon, kale & stock in to a 3 qt (or larger) pot. Cook on medium low heat, stirring often, until liquid has cooked down to a thick sauce (approx. 45 minutes). If dinner lags behind, add a little beef stock every so often and continue to cook down (however doing this will cause the beans to go from crisp and creamy to soft and mushy).
Subscribe to:
Comments (Atom)