Monday, June 22, 2015

Just a Tuesday night dinner ...

A couple of weeks ago I saw something at Whole Foods that looked cool and I thought would be easy and tasty ... Pacific Razor Clams.  Yeah, not so much.  But, like any adventurous cook I figured ... let's try it anyways!

A quick google search told me that I would need to clean the clams and then I would be able to partition and cook them.  Preferred preparation?  Fried.  Well, that part I could do at least.


As you can see from the picture, I was finally able to get the clams cleaned, partitioned and cooked.  I cooked them with a mix of salt, pepper and garlic in butter.  They were tasty but totally not worth the effort at this point.  Guess I'll have to head back to the west coast at some point and try them the "right" way so I can figure out how to correctly make them at home.


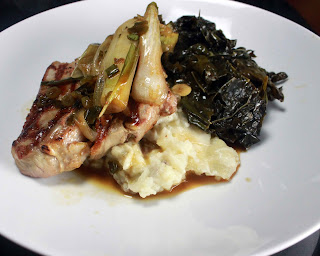
For the second part of this dinner I made grilled veal chops with a spring onion topper served over mashed potatoes and greens.

Saturday, June 20, 2015

Steamed clams and brown butter ... yup!

Having some fun out on the patio during the weekend is one of our favorite pastimes, and for those that haven't figured it out yet ... having fun = food.

For this snack I steamed up a batch of clams, but it was the accompaniment I served them with that stole the show.  Browned butter is a great flavor enhancer, and perfect for serving with steamed shellfish (or for basting a steak).

Browned butter is incredibly simple to make, and leaves a world of opportunities in terms of flavor you can add to it.  For this dish I pulled some fresh sage from the garden, but really any fresh herb will do.

Sage Browned Butter w/ Clams
12 Little neck clams
3 tbsp butter (I prefer a nice European butter like Plugra, but any butter will do)
1 large fresh sage leaf

Use an in pot steamer to steam the clams until they all open ... a larger pot ensure the clams have space to open.  If you use a smaller pot you may need to adjust the clams once some open to ensure the others aren't prevented from doing so.  

Melt the butter in a heavy sauce pan over medium heat.  While the butter is melting, cut the sage into strips.  Once the butter begins to foam, stir often with a whisk until the foam dissipates.  Add the sage and continue to cook for another couple of minutes (actual time will depend on the size of the sauce pan and how much of the butter is in contact with the bottom of the pan).  Once the butter has turned a nice caramel color, remove from heat and strain (this will remove the pieces of sage, not a required step) into a small ramekin to serve.  Enjoy!


Monday, June 15, 2015

An article about Brussel Sprouts? Why not?


9 out of ten times when I ask someone what they think about Brussel Sprouts, tell me they're disgusting and don't want any. I think these people are confusing boiled Brussel Sprouts or those Green Giant ones that you boil in the bag with what I'm talking about!

What then am I talking about?  I'm talking about sea salt, pancetta and a nice hot oven ... that's right, forget boiling, we're roasting!

Roasted Brussel Sprouts
1 bag fresh Brussel Sprouts
2 thick cut slices of pancetta (about 1/3 inch each)
1/2 Tbsp corse sea salt
1 Tbsp olive oil

First think you want to do is preheat your oven to 425F (well, after buying the ingredients of course).  While the oven is pre-heating, roughly chop the pancetta and place in a mixing bowl (don't cut too fine as it will shrink in cooking, but you don't want massive chunks either).  Wash your sprouts and then trim the bases of each and remove any suspect leaves.  Slice the sprouts in half and then add to the bowl.  Add the oil and salt and then toss to mix well.  Cook the sprouts on a baking sheet in a single layer until well browned.  Time in the oven is dependent on size.  Start by cooking for 15 minutes then check every five minutes until browned. Serve and enjoy!


Monday, June 1, 2015

Presentation School: Serving a bone in cut of meat, to share!

When serving a bone in cut of meat for 2 or more people to share, it's important to make it easy, but still look good.  Presentation is all about the little things that come together to give the impression of something much bigger.

One of my favorite ways to get people excited about the presentation is to serve a bone in cut of meat that has been cut away from the bone and then put back in place.

In the example you can see to the right, I took a bone in pork chop and sliced both sides along the bone to remove the loin and tenderloin cuts.  I then slice the pieces of meat and then line them back up with the bone so that they can be easily picked up by folks at the table with a fork or tongs.


The best part about this trick is that you can serve the cut of meat right on the cutting board, avoiding the need to dirty another serving dish (unless you want to of course).

For this dinner I served it much more homestyle with a storage container full of taco shop guac set alongside the pork on the cutting board.  No need to dirty up a host of serving dishes when it's just Shells and I eating!

Try this tip and watch you guests be impressed, enjoy!